DaVinci Resolve can show and burn in subtitles in its free version, but turning speech into captions, and animating them word by word, needs the paid Studio version. Here's how to caption a video in either one, and how to get animated, word-by-word captions in the free version too.
Can DaVinci Resolve add captions automatically?
Only in DaVinci Resolve Studio. The free version can't transcribe speech, so you type or import every line yourself. Here's what each version can do with captions:
| DaVinci Resolve (free) | DaVinci Resolve Studio | |
|---|---|---|
| Subtitle tracks, typed or imported | Yes | Yes |
| Captions made from the audio | No | Yes: Create Subtitles from Audio |
| Words highlighted as they're spoken | No | Yes: AI Animated Subtitles |
| Burn captions into the video | Yes | Yes |
| Largest export | Ultra HD, up to 60 fps | Higher than Ultra HD |
Automatic subtitles in DaVinci Resolve Studio
- Open your timeline on the Edit page.
- Choose Timeline › AI Tools › Create Subtitles from Audio.
- Choose the Language; Auto detects it for you. Then choose a Caption Preset, the Max Characters per Line, the number of Lines and the Gap Between Subtitles, and create the subtitles.
- Resolve adds a subtitle track to the timeline with the captions on it. Play it through, select any caption with a mistake, and correct its text in the Inspector.
Studio transcribes 14 languages out of the box, including English, Spanish, French, German, Italian, Portuguese, Japanese, Korean and Simplified Chinese. About 45 more come with the Extended AI Transcription Support Package, from the Extras Downloads Manager.
Add subtitles by hand in the free version
- On the Edit page, right-click in the track headers and choose Add Subtitle Track.
- Move the playhead to where the first line is spoken, right-click the subtitle track and choose Add Subtitle.
- Type the line in the Inspector, then drag the subtitle's ends in the timeline so it lasts as long as the line.
- Repeat for every line.
If you already have a subtitle file, choose File › Import › Subtitles. Resolve reads .srt, .vtt, .ttml and .xml files; drag the file from the Media Pool above your video tracks to add it.
Typing captions by hand is fine for a short clip. For anything longer, the Easy Caption Pro method below does the typing and the timing for you.
Style your subtitles
- The whole track: select the subtitle track and open the Track panel in the Inspector. You can change the font, colour, size, line spacing, kerning, alignment and position, and add a drop shadow, a stroke or a background.
- One caption: select it, tick Customize Caption and restyle it, down to a single word.
- Your own style, again: choose Save Track as Preset from the Subtitle Inspector's options menu.
- Titles as subtitles: since Resolve 20 you can drag a Fusion title template onto the subtitle track's header, and it overrides the track's own style. Since Resolve 21, subtitles also have fade handles.
Word-by-word animation is a Studio feature. Its Animated title templates, such as Word Highlight, colour each word as it's spoken; drag one onto the subtitle track's header and adjust it in the Inspector.
Animated captions in the free version, with Easy Caption Pro
We make Easy Caption Pro, a Mac app that turns speech into captions on your Mac, in 99 languages and without an internet connection. It has 280+ ready-made looks, from clean subtitles to word-by-word highlights and 3D captions, and it hands them to Resolve as a transparent clip. That works the same in the free version and in Studio.
Make the captions
- Open your clip in Easy Caption Pro and click Transcribe All.
- Fix any word in the Script Editor or on the timeline, and choose a look in Presets.
- In the Export menu, set Resolution to Match Source.
- Choose Export Captions Only › Transparent (ProRes 4444).
Put them on your video in Resolve
- Choose File › Import › Media (Command-I) and import the captions file into the Media Pool.
- Turn on snapping (press N) and put the playhead on the first frame of the clip you captioned. The Up and Down Arrow keys jump between edits.
- Hold Option and drag the captions file from the Media Pool onto the track above your clip, with its start on the playhead. Option-dragging brings in only the picture; the file carries a copy of the clip's sound, which would otherwise play twice.
- Play it back. Your video shows through all around the captions.
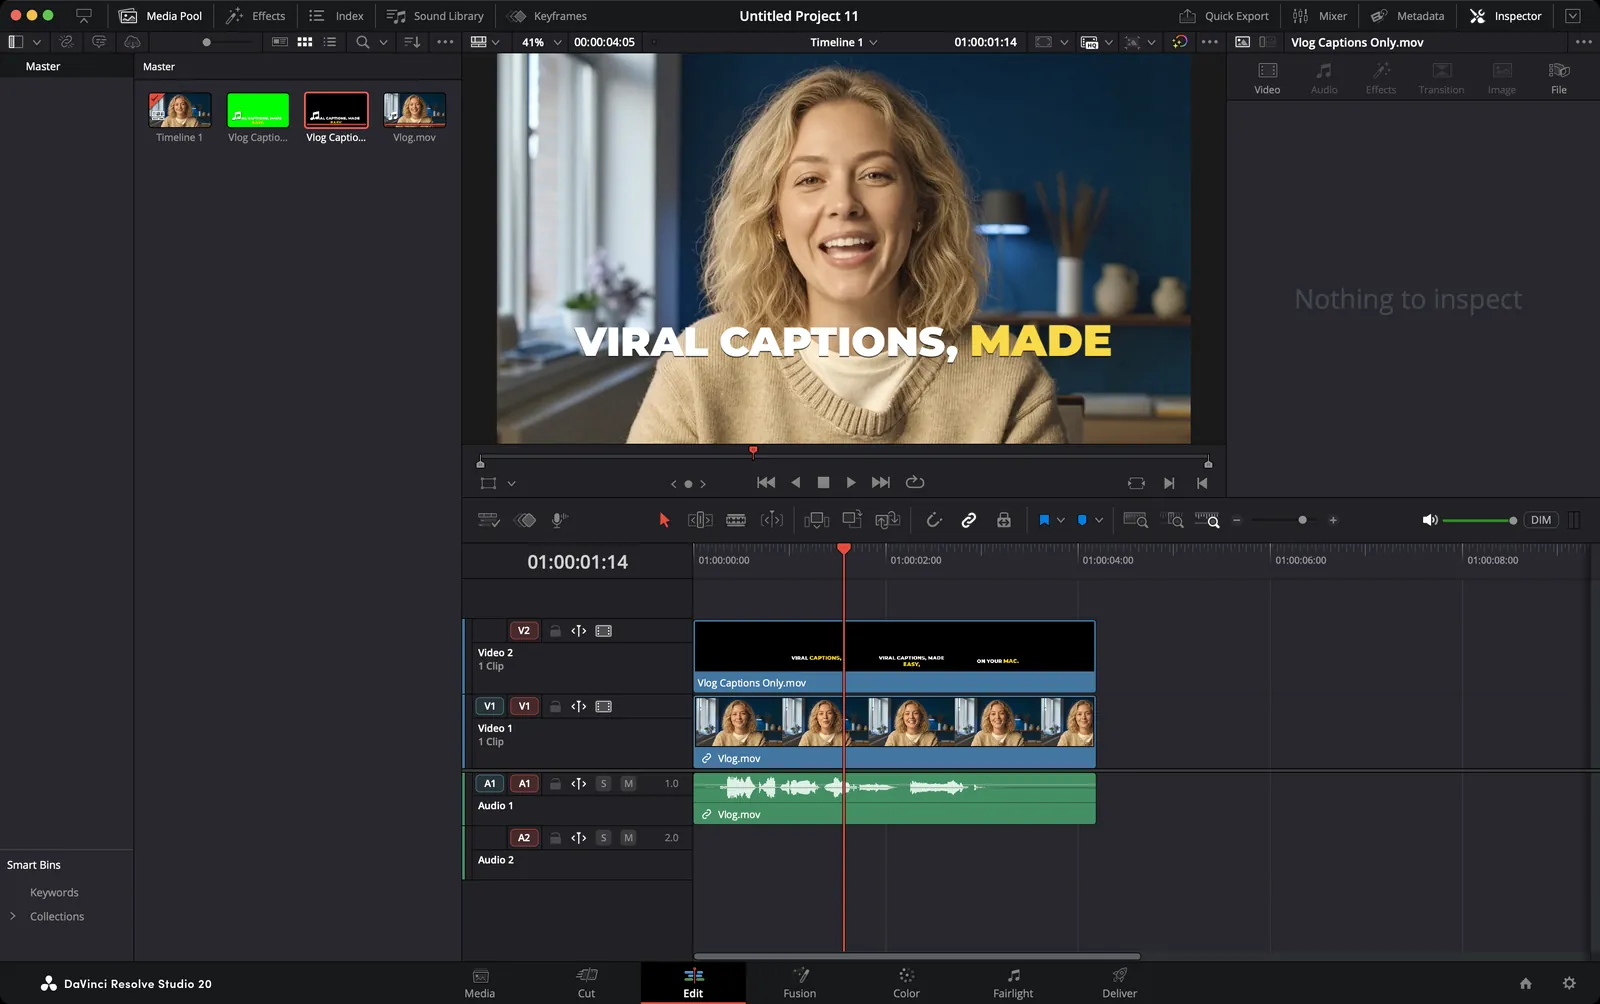
The captions file must be on a track above your video; the transparency shows whatever is underneath. Line it up by position, not by timecode: Resolve's timelines start at 01:00:00:00, and the captions file has no timecode of its own.
If you've trimmed the clip
The captions file starts at your clip's original first frame. If you've trimmed the clip's start, sped it up or zoomed it in Resolve, the captions won't follow. To caption just the part you're using:
- Put the playhead on the clip and press X (Mark Clip) to set the timeline's In and Out points around it.
- Choose File › Quick Export. With In and Out points set, Resolve exports just that part.
- Caption that file in Easy Caption Pro and export the transparent captions, as above.
- Open the captions file in the Source Viewer and press F12 (Edit › Place on Top) while the In and Out points are still set. It lands exactly over the clip, on the first empty track above it.
- Place on Top brings in the sound too, so Option-click the captions' audio clip in the timeline and delete it.
Or caption the finished video
The simplest route of all is to finish your edit, export it, and caption the export. On the Deliver page, choose a preset such as H.264 Master, keep Render set to Single clip, click Add to Render Queue, then Render All. Open the export in Easy Caption Pro, caption it, and click Export with Captions for a finished video. It also avoids drift with phone footage, which often has a variable frame rate that Resolve doesn't always handle reliably.
Export with captions burned in
- Resolve's subtitles: on the Deliver page, open the Video settings, turn on Export Subtitle and set its Format to Burn into video. You can also export them as a separate file or embed them as captions in a QuickTime or MXF file.
- Easy Caption Pro captions: they're part of the picture, so render as usual with Render set to Single clip and the captions' track switched on.
Troubleshooting
- Create Subtitles from Audio is greyed out
- It's a Studio feature. In the free version, type the subtitles yourself or make them in Easy Caption Pro.
- The subtitles don't show up in the render
- Check that Export Subtitle is on with Burn into video chosen in the Deliver page's Video settings. Resolve shows only one subtitle track at a time, so make sure the one you want is switched on.
- The sound is doubled or echoey
- The captions file brought its copy of the clip's sound. Option-click its audio clip in the timeline to select just the audio, and delete it.
- The captions slowly drift out of sync
- Usually phone footage with a variable frame rate. Caption the exported edit instead of the original clip.
- The captions look soft
- They were scaled up. Export them from Easy Caption Pro with Resolution set to Match Source. The free version of Resolve exports up to Ultra HD.
FAQ
- Are automatic subtitles free in DaVinci Resolve?
- No. Create Subtitles from Audio, and the animated word-by-word subtitles, are only in DaVinci Resolve Studio. The free version can show and burn in subtitles you type or import, but it can't make them from speech.
- How do I make captions appear word by word?
- In Studio, use the Animated title templates on your subtitle track. In the free version, make the captions in Easy Caption Pro and bring them in as a transparent clip; its looks include word-by-word highlights and one-word-at-a-time captions.
- Does it work in my language?
- Studio transcribes 14 languages, and about 45 more with an extra download. Easy Caption Pro transcribes 99 languages on your Mac, without an internet connection.
- Will the captions keep their transparent background in the free version?
- Yes. The free version reads ProRes 4444 with its transparency, and composites it over the track below by itself.
Viral captions. Made easy.
Transcribe on your Mac, fix any word in seconds and style animated captions, then export a finished video or a transparent overlay for your editor.
Get Easy Caption Pro