Final Cut Pro can caption a video for you, as long as it's in U.S. English and your Mac has Apple silicon. Here's how to use its own tools step by step, and how to bring in animated, word-by-word captions from Easy Caption Pro for speech in any of 99 languages.
Does Final Cut Pro have automatic captions?
Yes. Since Final Cut Pro 12.3, Generate Captions listens to your timeline and writes the captions for you. It can make two kinds:
| Closed captions | Subtitles | |
|---|---|---|
| What they are | Caption text in a lane at the top of the timeline, in Apple's iTT format | Ordinary title clips, using the Subtitle title |
| Look | Limited: a few colours, bold, italic and position, and no choice of font | Any font, size and colour, with animations such as a word-by-word highlight |
| Viewers can switch them off | Yes, unless you burn them in | No, they're always part of the picture |
There are limits. Generate Captions needs a Mac with Apple silicon, it works in U.S. English only, and the first time you use it, Final Cut Pro downloads a language model, so you'll need an internet connection. Apple also notes that background noise, music and people talking over each other make it less accurate.
Generate captions automatically
- In the timeline, select the clips with speech in them.
- Choose Edit › Generate Captions › Subtitles (Shift-Command-S) for captions you can style, or Edit › Generate Captions › Closed Captions (Shift-Command-C) for closed captions. You can also Control-click the selection and choose Generate Captions.
- Wait while Final Cut Pro transcribes the audio. Subtitles appear as title clips above your video; closed captions appear in the caption lane at the top of the timeline.
- Play the project through and correct any words it got wrong, as you would in any title.
In Final Cut Pro 11.0 to 12.2, choose Edit › Captions › Transcribe to Captions instead. It makes English closed captions and needs macOS Sequoia or later.
Style subtitles and highlight words one by one
Because subtitles are titles, you style them in the inspector like any other text:
- In the Text inspector, change the font, size and colour.
- In the Title inspector, choose an Animation Style: None, Fade, Scale, Highlight or Fill. Highlight colours the words one at a time as they're spoken.
- Set Animate By to Character, Word, Line or All.
- For a 9:16 video, turn on Vertical Social Media Safe so the captions stay clear of the apps' buttons.
Since 12.3 you can select all your subtitles with one command and change their position, scale and alignment together.
Closed captions can't do much of this. CEA-608 captions get eight colours and 32 characters per line, and iTT captions get colour, bold, italic, underline and a top or bottom position. To style closed captions properly, turn them into subtitles: choose Edit › Closed Captions › Duplicate Captions to Subtitles.
Add captions by hand
If your Mac can't run Generate Captions, or the speech isn't in English, you can still type subtitles yourself:
- Open the Titles and Generators sidebar and choose the Subtitles category.
- Drag the Subtitle title above your video, where the first line is spoken.
- Type the line in the viewer, then drag the title's ends so it lasts as long as the line.
- Repeat for every line.
That's fine for a short clip. For a five-minute video it means typing and timing well over a hundred lines, which is where the next method saves you the afternoon.
Animated captions for speech in 99 languages, with Easy Caption Pro
We make Easy Caption Pro for exactly the cases Final Cut Pro leaves out: speech in any of 99 languages, and caption styles beyond a highlight, from bold word-by-word looks to 3D captions. It transcribes on your Mac, without an internet connection, and gives you the captions back as a transparent clip that sits on top of your video.
Make the captions
- Open your clip in Easy Caption Pro and click Transcribe All.
- Fix any word in the Script Editor or on the timeline, and choose a look in Presets.
- In the Export menu, set Resolution to Match Source.
- Choose Export Captions Only › Transparent (ProRes 4444).
Put them on your video in Final Cut Pro
- Choose File › Import › Media (Command-I) and import the captions file.
- In the timeline, put the playhead on the first frame of the clip you captioned. The Up and Down Arrow keys jump between edit points.
- In the Edit pop-up menu at the top left of the timeline, choose Video Only (Shift-2). The captions file carries a copy of the clip's sound, and this leaves it out.
- Select the captions file in the browser and press Q (Edit › Connect to Primary Storyline). Keep the pointer off the timeline as you press Q, or the file connects where the pointer is instead of at the playhead.
- Play it back. The captions sit over your video, and they move with the clip if you move it. Set the Edit pop-up menu back to All (Shift-1) when you're done.
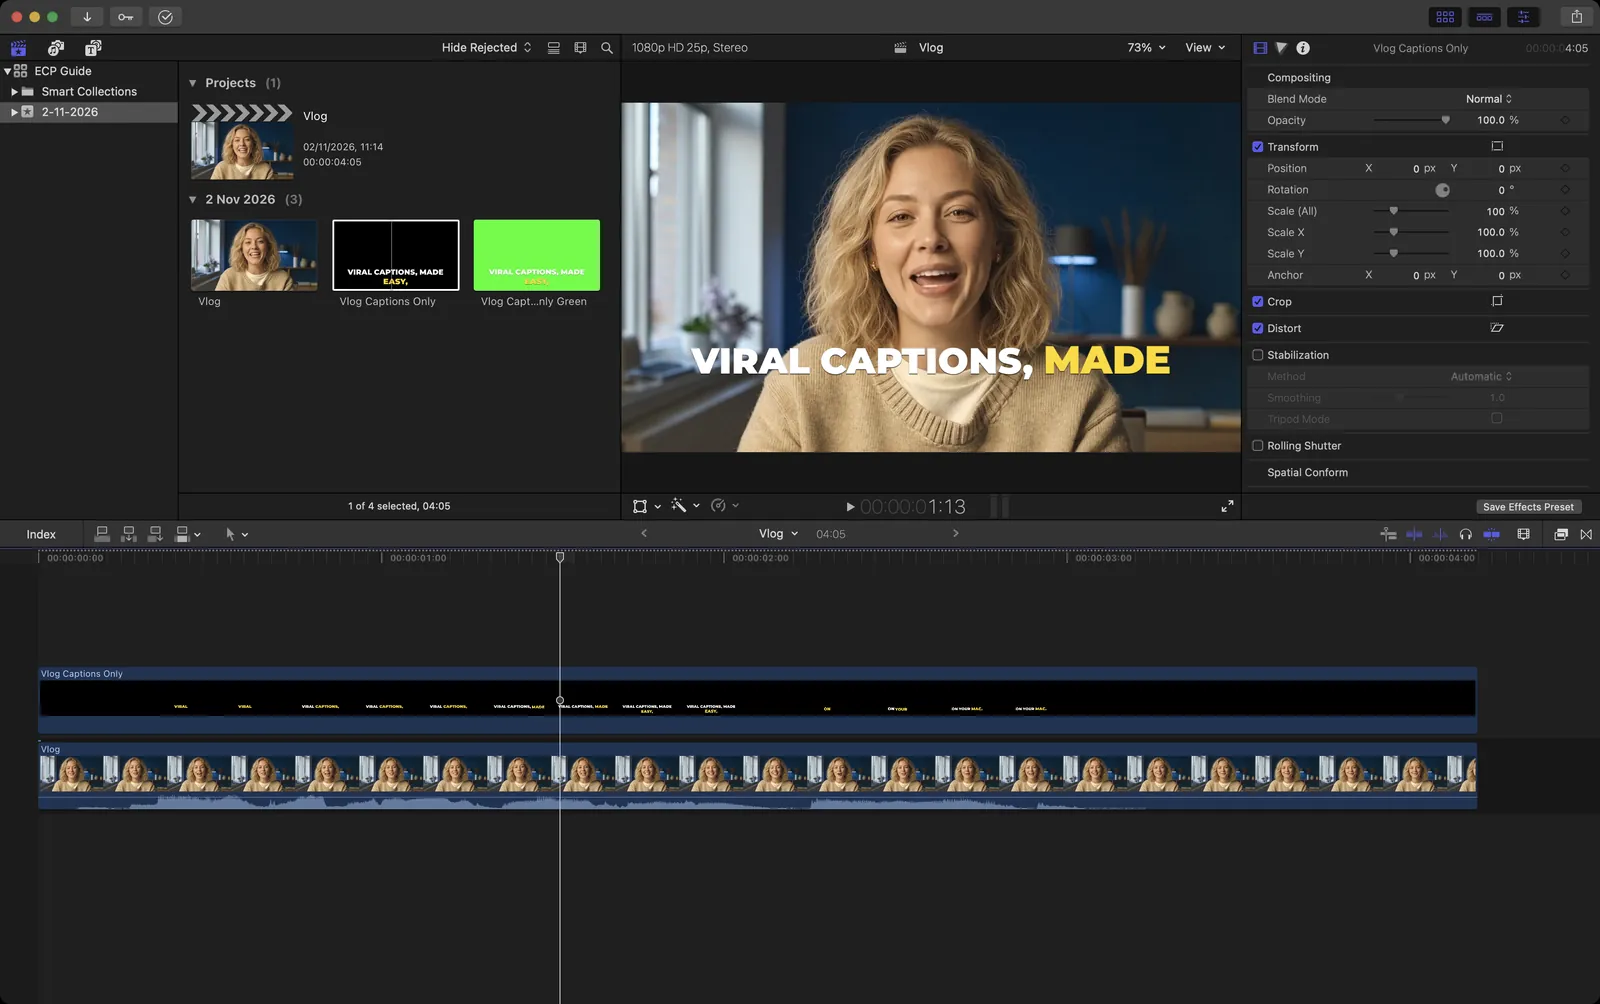
The file is the same length as the clip and has the same frame rate, so the words stay in sync.
Or caption the finished video
If you're posting straight to TikTok, Instagram or YouTube, there's an even simpler route. Choose File › Share › Export File (Command-E) to export your finished edit, open it in Easy Caption Pro, caption it, and click Export with Captions. You get a finished video with the captions burned in. Safe Zones in Easy Caption Pro shows each app's buttons over your video, so you can keep the captions clear of them.
Export with captions burned in
- Subtitles are titles, so they're always part of the exported picture.
- Closed captions are only burned in if you ask. Choose File › Share › Export File, click Roles, click the blue Captions button, and choose a language from the Burn in captions pop-up menu. You can also embed CEA-608 captions in the file or export the captions as separate files.
- Easy Caption Pro captions are a video clip, so they export like any other clip.
Troubleshooting
- Generate Captions isn't available
- It needs a Mac with Apple silicon and Final Cut Pro 12.3 or later. In 11.0 to 12.2, look for Transcribe to Captions under Edit › Captions; it also needs macOS Sequoia or later.
- The captions come out in the wrong language
- Generate Captions only understands U.S. English. For any other language, use the Easy Caption Pro overlay above.
- The captions disappear after export
- Closed captions only appear in the picture when you burn them in (Roles › Burn in captions), or in players that show captions. Subtitles and Easy Caption Pro overlays are always in the picture.
- The sound is doubled or echoey
- The captions file brought its copy of the clip's sound. Select it and choose Modify › Adjust Volume › Silence (–∞), or connect it again with Video Only.
FAQ
- Does Final Cut Pro's automatic captioning work in my language?
- Only if your language is U.S. English: Generate Captions doesn't transcribe anything else. Easy Caption Pro transcribes 99 languages on your Mac, and you can bring its captions into Final Cut Pro as an overlay.
- Can Final Cut Pro show captions one word at a time?
- Its subtitles can highlight words one at a time with the Highlight animation style, and Animate By can bring the text in word by word. For more looks, such as word boxes, karaoke colours, bouncing words or 3D captions, use one of Easy Caption Pro's 280+ ready-made looks.
- Will the captions keep their transparent background?
- Yes. Transparent (ProRes 4444) keeps the transparency, and Final Cut Pro reads it without any keying. Only use Green Screen or Blue Screen if another app can't read transparency.
- Can I edit the captions after they're in Final Cut Pro?
- An overlay is a video clip, so change the words in Easy Caption Pro and export again; your project is saved there automatically. Then replace the clip in Final Cut Pro.
Viral captions. Made easy.
Transcribe on your Mac, fix any word in seconds and style animated captions, then export a finished video or a transparent overlay for your editor.
Get Easy Caption Pro